|
||||
|---|---|---|---|---|
| Free Download | ||||
|
|
|
Image file | ||
Level of difficulty:
Easy
Advanced


|
||||
|---|---|---|---|---|
| Free Download | ||||
|
|
|
Image file | ||
Drawing an airplane doesn't have to be hard! With the help of these
instructions, you can create a sleek airplane step by step.
We recommend pencil (e.g. HB or H2), eraser, ruler,
drawing pencil and colored pencils of your own taste for this drawing.

Use the pencil to draw a straight line that slants slightly upward. Fairyl free to use a ruler for this.

In the front and back thirds, draw small circles around the line with the pencil. The front circle is larger than the back one. Look carefully at the template so that you position the circles correctly.

You now connect the circles above and below with one line each. The result is a streamlined body - the airplane fuselage. If you want, you can already draw the lines with the pencil, because they will remain later.

In front of the left circle, use the pencil to draw the "nose" of the airplane with the windows for the cockpit. You also draw the rear part with the tail fin. Then place the passenger windows along the center line. If the shapes fit, trace the outer contours with the drawing pencil.

Now take the pencil again and draw two guide lines in the back of the plane, parallel to each other and diagonally from bottom right to top left.

Place the horizontal tailplane (at the rear of the tailplane) below the upturned fin. Then start drawing the wings, following the guide line drawn in step 5.

Use the drawing pen to outline the contours and create further details as shown in the template. Then remove all the guides.

When you have finished drawing, color in your airplane. In the example, the plane is blue and white. But you can use other colors if you like.
More Template Ideas


|
||||
|---|---|---|---|---|
| Free Download | ||||
|
|
|
Image file | ||
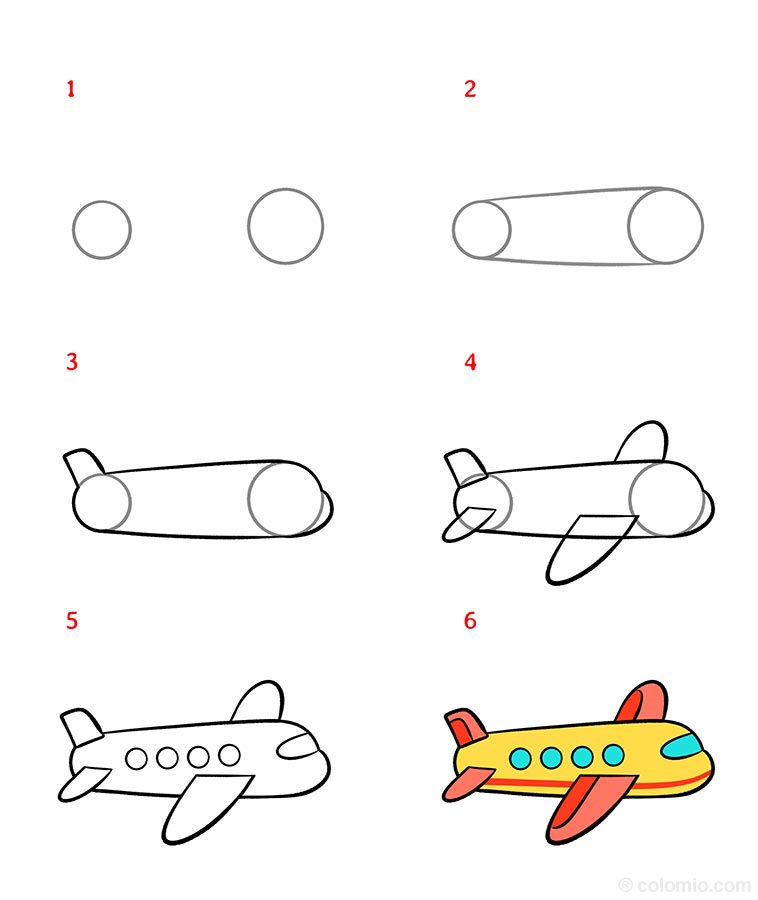
This plane is very easy to draw with the help of the instructions.
Step by step, your plane will take shape.
You will need a
pencil, a black drawing pencil and various colors. You can
later use the eraser to erase the guide lines.

Use the pencil to draw a smaller circle on the left and a slightly larger one on the right. You can see how large the distance must be in the template.

You connect the two circles with lines running up and down to form a solid.

Now draw the contours with the pencil. Take this opportunity to draw the upright tail fin. This "arises" from the left circle. The front circle is given a "snout" - the nose of the plane.

Draw the transverse elevator below the tail fin. You also add wings to your airplane. Refer to the template for the exact position.

Use the pencil to trace all the remaining contours. Draw windows in the cockpit and on the side of the plane. Then remove all the guide lines.

You color your airplane. In the template the plane is yellow and red with blue windows. You can choose the same colors or select others.


